
Weather App With Javascript

An experienced full stack developer, project manager, mentor, and entrepreneur who defies conventional standards. Actively contributing to the programming community by mentoring newcomers and fostering collaboration. Expertise in creating robust and scalable web applications and leading cross-functional teams.
Introduction
This project is simply in HTML, CSS, and JavaScript with OpenWeatherMap Api . The weather section includes the following weather characters:
City, Date, Temperature and Humidity.
Users can search the name of any city across the world.
Making of the project
OpenWeatherMap API
OpenWeatherMap has a very good API. They offer a free tier that allows up to 60 calls per minute along with 5 day and 3 hour forecasts.
Create an OpenWeather account
To get started we need an account. Head over to Open Weather to Sign up.
Generate a Key
After sign up, a key automatically gets created for you. The API keys are accessed in your account settings. This key will be used when we fetch the weather which acts as an identifier so OpenWeatherMap knows who is asking for data.
Step 1: Create an HTML document (for links to your JavaScript and CSS files and the structure of the page.)
<!DOCTYPE html>
<html>
<head>
    <title>TechBadGuy Weather Application</title>
    <link rel="stylesheet" type="text/css" href="weather.css">
    <link rel="stylesheet" type="text/css" href="https://fonts.google.com/">
</head>
<body>
    <div class="container">
        <div class="heading">
            <h1>Weather Application</h1>
        </div>
        <div class="input">
            <input type="text" name="search" class="input-search" placeholder="Enter city name..">
        </div>
        <div class="box">
        <div class="location">
            <div class="location-city"></div>
            <div class="location-date"></div>
        </div>
        <div class="temperature">
            <div class="temperature-temp"><span></span></div>
            <div class="temperature-type"></div>
            <div class="temperature-range"></div>
        </div>
        </div>
    </div>

    <script src="weather.js"></script>
</body>
</html>
Step 2: Create a JavaScript file, write the functions that hit the API and displays the data (functions that can take a location and return the weather data for that location).
window.onload=function(){
document.querySelector('.input-search').value='';
}
const api_details={
url: "http://api.openweathermap.org/data/2.5/",
api_key:"60bbd59ec7556e88c0f6b5a2080aebaa"
}
const input=document.querySelector('.input-search');
input.addEventListener('keypress',showData)
function showData(e){
if(e.keyCode===13){
showResults(input.value);
//console.log(input.value);
//console.log('Hello')
}
//e.preventDefault();
}
async function showResults(value){
const data=await fetch(`${api_details.url}weather?q=${value}&units=metric&APPID=${api_details.api_key}`)
const fdata=await data.json();
console.log(fdata)
if(fdata.message==="city not found"){
const ele=document.createElement('h1')
ele.className="heady"
ele.appendChild(document.createTextNode("City Not Found"))
// const ddd=document.querySelector('.box');
const fff=document.querySelector('.temperature');
// fff.insertBefore(ele,ddd);
fff.appendChild(ele)
console.log('lol')
}
else{
displayData(fdata);
}
}
function displayData(data){
const location_city=document.querySelector('.location-city');
location_city.innerText=`${data.name},${data.sys.country}`
let time=new Date();
const date=document.querySelector('.location-date');
let months_year=["January","February","March","April","May","June","July","August","September","October","November","December"];
let days_week=["Sunday","Monday","Tuesday","Wednesday","Thursday","Friday","Saturday"];
let day=days_week[time.getDay()];
let pdate=time.getDate();
let month=months_year[time.getMonth()];
let year=time.getFullYear();
date.innerText=`${day} ${pdate} ${month} ${year}`
const tempp=document.querySelector('.temperature-temp');
tempp.innerHTML=`${Math.round(data.main.temp)}
<span>˚C</span>
`
const type=document.querySelector('.temperature-type');
type.innerText=`${data.weather[0].main}`
const lowHigh=document.querySelector('.temperature-range');
lowHigh.innerHTML=`${Math.round(data.main.temp_min)}<span>˚C</span>/${Math.round(data.main.temp_max)}<span>˚C</span>`
}
Step 3: Add styling with CSS ( you can add any styling you like)
*{
    margin:0;
    padding:0;
    box-sizing: border-box;
}
body{
    background-image: url('Untitled\ design.png');
    background-repeat: no-repeat;
    background-size: cover;
    /*background-color: green;*/
}
.container{
    display: flex;
    /*align-items: center;
    justify-content: center;*/
    min-height: 100vh;
    flex-direction: column;
}
.input{
    display: flex;
    justify-content: center;
    align-items: center;
    padding: 50px 15px 15px;
}
.input-search{
    width: 100%;
    max-width: 320px;
    padding: 10px 15px;
    background-color: lightgray;
    outline: none;
    border-radius: 20px 8px 20px 8px;
    border:none;
    font-family: 'Noto Sans JP', sans-serif;
    font-size: 15px;
    border: 2px solid rgba(9, 0, 14, 0.589);
    font-weight: 400;
    /*transition: 0.2s ease-out;*/
}
.input-search:focus{
    background-color: ghostwhite;
}
.box{
    flex: 1 1 100%;
    padding: 25px 25px 50px;
    display: flex;
    flex-direction: column;
    align-items: center;
    text-align: center;
    /*justify-content: center;*/
}
.location-city{
    font-size: 50px;
    font-family: monospace;
    margin-bottom: 15px;
}
.location-date{
    font-size: 30px;
    font-family: 'Kanit', sans-serif;
    font-weight: 300;
}
.temperature-temp{
    font-family: serif;
    font-size: 80px;
    font-weight: bold;
}
span{
    font-weight: 500;
}
.temperature-type{
    font-family: 'Dosis', sans-serif;
    font-size: 50px;
    font-weight: 600;
}
.temperature-range{
    font-family: cursive;
    margin-top: 10px;
    font-size: 30px;
    font-weight: bold;
}
.heading{
    text-align: center;
    margin-top: 0px;
    font-size: 40px;
    margin-bottom: -10px;
    font-family: cursive;
    font-weight: 600
}
h1{
    color: yellow;
    background: linear-gradient(to bottom,rgb(238, 9, 188),rgba(44, 5, 153, 0.795));
    /*border-bottom: 5px solid yellow;*/
    /*color: linear-gradient(to left,black,yellow);*/
    animation-name: appear;
    animation-duration: 20s;
}
@keyframes appear{
    from {color: yellow;}
    to {color: white;}
}
Run your code and display the information on your webpage!
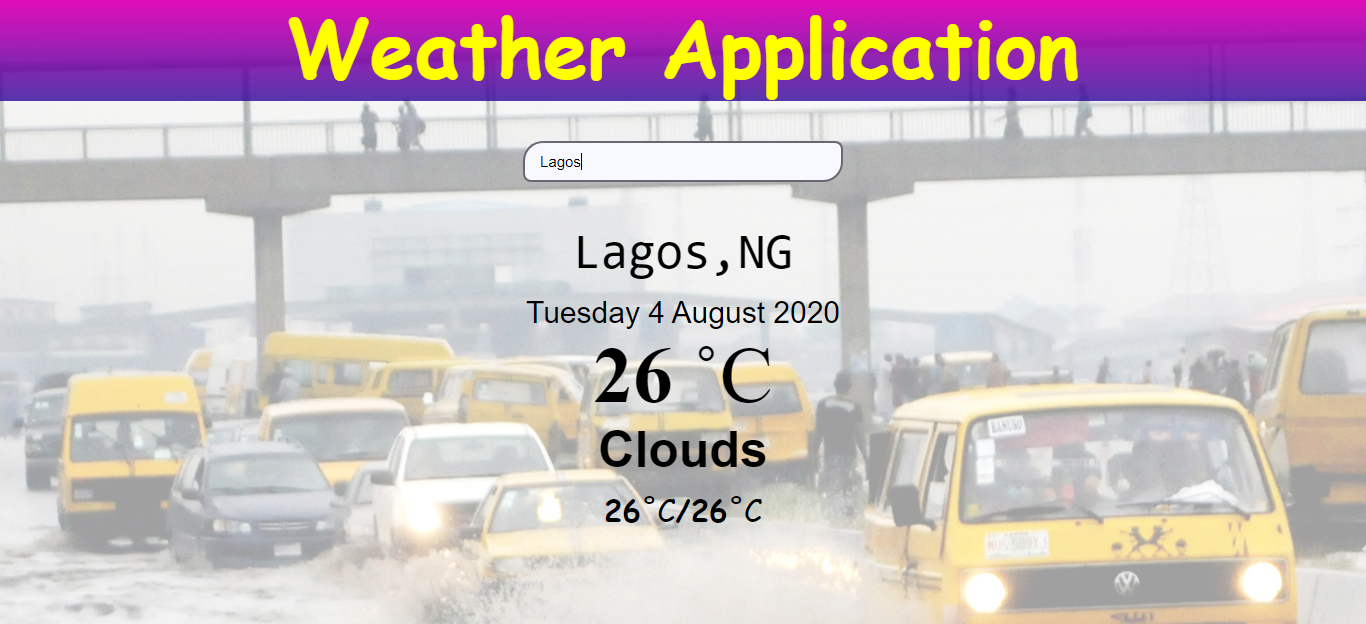
Credits; background image source: Everyday Lagos


